Wow…. It’s Been Awhile (Staind) since I have written a post !! Its crazy how 18 months can just fly by….I would say fly by when you are having fun but that was not really the case 😉
I’ve spent the past 18 months (give or take) caught up in a customer project for deployment of a Data Platform in the Cloud. I’ve also been juggling some other work around Azure Stack Hub and FinOps. Mixed in this all has been me trying to upskill in Security, Responsible AI and Microsoft Azure AI (which is the talk of the town at the moment.
Prior to rambling on…I’m hoping to revitalise this blog once again…with more frequent posts around my daily ramblings/learnings. Before I do though….how about a little something to start…
Microsoft have recently released an updated set of Management Packs (MPs) for Microsoft System Center Operations Manager (OpsMgr) or SCOM which allows monitoring of Azure Stack HCI.
The new MPs cover a range of Azure Stack HCI scenarios including the Base OS, Hyper-V, Storage Spaces Direct (S2D), Software Defined Networking (SDN) , and the Azure Stack HCI Cluster components.
Note: It is important to note that these versions support Azure Stack HCI versions 21H2 and 20H2 as well as have been designed for use with Microsoft System Center Operations Manager 2019 UR3 and above.
Typically, you should not be needing to install Windows Admin Center (WAC) on Windows Server Core however recently I lost (long story) my previous installation of WAC in my Home LAB and needed to re-deploy it.
For this post, I will be (re)installing the latest version of WAC which at the time of writing was version 2110.
Microsoft have a good article which is pretty straight forward so I wont be repeating that word-for-word but rather including some screenshots to help others (like me) who may need it in the future.
Step 1
First step is to get the Windows Operating System (in this case Windows Server 2019) installed as Server Core on my Home LAB Hyper-V Host as a Guest VM.
Windows Server 2019 Setup Screen
NOTE: I’m not going to spend anytime on what hardware spec or anything related to the spec of my Hyper-V VM as well as not spending time on the OS install.
Next is to select the non-Desktop experience version (aka Core):
Selecting the OS version
After the OS install, renaming the machine, performing updates to the OS, and adding it to the domain we are now ready for the install.
Step 2
Next step is to get the Windows Admin Center installation media onto the server and run the installation.
Old school….with a Command Prompt
Once we run the MSI from the command prompt we are presented with the WAC setup window:
Kicking things off
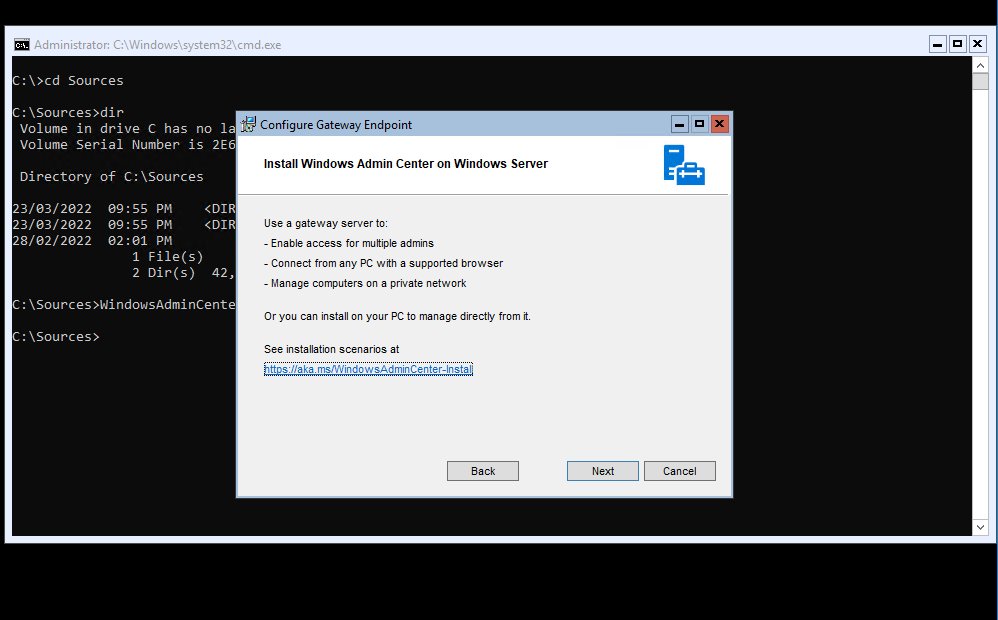
Since we are installing this on a Windows Server that will act as a gateway, we will see the Gateway Endpoint section of the installer:
Recognising the Gateway Installation
During the installation, I went ahead and ticked the box automatically update Windows Admin Center but did NOT tick the box for ‘Use WinRM over HTTPS only’ (as this will break things with WinRM…see this post from DCom)
Ticking the boxes
For my LAB environment I am going with leveraging the self-signed SSL certificate however in a Prod environment you would want a proper SSL cert. I also went ahead and ticked the box to ‘redirect HTTP port 80 traffic to HTTPS’.
Configuring SSL and Redirect
The installation process runs and takes roughly a couple of minutes to complete:
Installing WAC
Last but not least, we are presented with the final screen of the installer with the URL to use (remember to save this somewhere else).
Done !!
Step 3
Last but not least is to navigate to our fresh WAC install using a supported browser. You will likely see the following screen (if you went with the self-signed certificate option) and the cert would have been issued by Windows Admin Center.
Not a problem
When you click proceed you will be taken to the Windows Admin Console and need to authenticate with an account and then presented with the whats new screen.
Note: If like me you installed WAC on a domain joined machine you will need to use an account that has the appropriate permissions on the Windows Server acting as the gateway.
It has been a while since I last dropped a post here…but for good reason.
I have been caught up in all things “Azure Stack” for the past few months. This had mainly been around Azure Stack Hub but more so recently Im getting across Azure Stack ‘Hyper-Converged Infrastructure’ (or HCI as its known).
This post is more however about how to get started and test out an Azure Stack HCI for evaluation or learning purposes….
DISCLAIMER: Im not 100% sure if this a supported method or not for say production deployments however I am in the process of testing this for learning purposes.
Open a new PowerShell ISE window and paste (or type) the following commands:
As of late, I have been involved more and more in Azure Stack Hub but more specifically the Azure Stack Development Kit (ASDK).
One of the challenges I have had (and I think some people have as well) is the best method to stop and start the ASDK without totally messing it up.
I’ve come across the PowerShell command on the Microsoft Docs site which states you run Stop-AzureStack and the shutdown process will commence.
Once this kicks off, the following is displayed (while it runs the shutdown of the ASDK Fabric VMs) and then the ASDK host shuts itself down as well:
Status and Progress of ASDK Shutdown
Note: During my testing, when you start the ASDK Host again, the ASDK Fabric VMs start themselves up automatically in the correct sequence however this does take some time. If you are having issues with these not starting, refer to the commands (again on the Microsoft Docs site) to start these up.
One of the great new features that I have been looking to try out with the latest WAC version (announced at Ignite 2020) is the Clone VM feature. After I had upgraded from my previous version (WAC 2007) it was ready to give it a spin.
First things first is to find one of my hosts with enough disk space and select a ‘generic VM’ for my initial test.
I used the filter capability in WAC and found my lucky candidate
The lucky Generic VM
Next was to use the manage drop down (after selecting the VM in the checkbox) and choosing ‘Clone’:
Easy navigation option
Once I selected ‘Clone’, I then needed to provide a name for the new VM:
Give me a name please
And I also have the option (nice touch by the way) to select the path from the drop-down for where I want it to be stored….in this case I chose the default location for my Hyper-V Host:
Location for VM
Once you click clone, you are presented with a warning as follows:
Disclaimer alert !!
Lastly, you enter the creds of your source VM and once click go per se…its ay for away
Beam me up scotty
Now, I will let this run in the background…..and we will follow up next time around how it went.
If you have been living under a rock and not aware that Microsoft Ignite has taken place recently….then you should be.
What was not made so readily available are the announcements that were made around Windows Admin Center in version 2009 (thats year 2020 month 09 by the way…not 2009). As you know, I am a big fan of WAC and use it (and advocate it) pretty much weekly if not daily.
One of the more exciting features that I am looking forward to testing out is the ‘Live Storage Migration’ feature and the ‘Clone VM’ functionality.
For all the low down on the new features, see the latest post on the Windows Admin Blog.
As per previous posts here and here, I am always looking at ways to get the latest updates applied to my WAC server which runs on Windows Server 2019 Core….and as you would have seen before…the process is pretty straight forward….actually, its identical !!
As per my previous post in June you would have seen I performed the update to my Windows Admin Center (WAC) Gateway from 1910 to 1910.2. This was not a major upgrade but did add a few nice features…….but not as much as what WAC 2007 has provided !!
As per before, we will download the .MSI package and copy it to the VM running on Windows Server 2019 Core.
Next, was to connect to my VM (for this exercise I used Hyper-V Manager and the VM console connection) and login as follows:
Next was to navigate to the location and run the MSI as follows:
Next up was running through the install with Next -> Next -> Next….oh wait…….now, this is new….dont remember this from last time:
Next was to replace my self signed cert (something I did not show last time) with a new one (yes….I know i should use a proper one) and made sure the redirect HTTP to HTTPS was selected:
And last but not least….to click install:
Once installed….its as simple as clicking finish to complete the update/upgrade:
Having used Windows Admin Center (aka WAC) for some time (currently on 1910) and installing it on a Server Core VM in my Home LAB, I thought it best to get it upgraded.
Initially, I thought it was going to be a pain to get done but after reviewing the content on the Microsoft Docs site, I realised its fairly straight forward for my deployment/implementation.
First things 1st is to download the latest MSI for WAC from the Microsoft Evaluation Center site. Then I copied this over to a folder on my WAC VM.
Next, was to connect to my VM (for this exercise I used Hyper-V Manager and the VM console connection) and login as follows:
Next was to navigate to the location and run the MSI as follows:
Next, I ran through the installer…and followed the bouncing ball (or next, next, NEXT, finish as an ex-colleague once said) to navigate through the panes.
Note: What I am not showing here is I replaced my self-signed cert as part of the install/upgrade since my previous one expired. Typically, you should not need to do this (and you can choose to retain the current cert) however its good to know you have this option.
Once, the install is complete you will see the screen below and can head to the updated WAC interface as per similar to the screenshot below:
Recently, I have been reading about PowerShell 7 and some of the nice new features and functionality it offers. Many of the guys and girls I follow on Twitter have been posting about it, so I thought its worthy of running it up.
Firstly, let me just say that I was not expecting it to be a separate application per se but rather replace my current Windows PowerShell…at least from the icon perspective.
Thanks goes out to Thomas Maurer’s Blog Post for how to install and update PowerShell 7 which got me going…..
After the install, I noticed the following when doing a comparison: